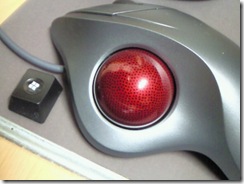
Logicool TM-250に慣れた

この記事は2年以上前に書いたものです。
そのため情報が古い可能性があります。ご了承ください。m(_ _)m

Logicool TM-250を購入してから、2ヶ月も経過してるのでそりゃそうだろ。って話ですが。

実際は2週間ほどで普通に操作する分には問題なくなりました。ただ、細かい操作やマウスジェスチャーはスムーズに出来なかった。

で、2ヶ月後の現在は、ある程度の細かい作業とマウスジェスチャーはスムーズに出来るようになりました。絵を描いたりは無理。元々絵心無いからあれですが。

巷では、トラックボールにすると手首が疲れないという話もあるらしいですが、自分の場合は、マウスを使って時も手首をほとんど動かさなかったので、親指と小指だけで動かしてたようなものなので、疲労度は変化なし。

・・・

そんなこんなで、会社用にもう1個買おうか迷い中。

カテゴリー: ハードウェア | タグ: | コメントする

Logicool TM-250を購入

この記事は2年以上前に書いたものです。
そのため情報が古い可能性があります。ご了承ください。m(_ _)m

何となくトラックボールを使ってみたくなった。ってだけの理由で購入。

200907212326002 200907212326000 200907212326001

まだ1日しか使ってないからだろうけど、サッパリ慣れず。。
しっくりも来ない。これは、今まで使ってたマウスより一回りでかいのが原因だろう。
まぁ、しばらく使ってみよう。


ホントは、

が欲しかったけど、9,000円程するので断念。 初トラックボールなので、お試しで買うには高い。。

TM-250は、USBに接続しただけで普通に使えたので、付属のSetPointとかいうToolをインストールする必要は無かったけど、試しにインストールしてみた。でも、ボタンの割り当てを変更するとかは別に要らないので、即アンインストール。

・・・その後しばらくして気付いたのが、キーボードのキーが、
US配列から日本語配列へ変更されてしまっているという。。。
ここ最近でインストールした物は、SetPointしか無いので、
どう考えても、SetPointのせいな訳ですが、アンインストール済みなので、
残骸が残ってしまってる可能性が高い。

仕方がないので、システムの復元でSetPointインストール前に戻したところ、
元のUS配列なキーに戻った。

厄介なToolだなぁ。。

カテゴリー: ハードウェア | タグ: , , | コメントする

英文を読めるようになりたい

この記事は2年以上前に書いたものです。
そのため情報が古い可能性があります。ご了承ください。m(_ _)m

話す(Speaking)のと聴く(Listening)のは置いといて、とにかく読み(Reading)が出来るようになりたい。

なんで、英文を読めるようになりたいかというと、

辺りをスラスラ読みたい。ってのと、
専門書も原著(洋書)の方が圧倒的に安かったりするんで。
学生の頃、↓これ(版数はもっと古かったけど)を買おうとしたけど、高すぎて買えず。。


↓こっちの原著(洋書)だと、↑この訳書の半額くらいで買える。っていう始末。


とは言っても、何から初めれば良いかサッパリ。。
周囲を見渡してみた限り、英語の勉強に役立ちそうなアイテムとしては、以下がある。

  • 好きな武将の調査に大活躍中の電子辞書(SR-G7000M)
  • 「高校の英文法を基本からおさらいする本 イチからやり直し編」
  • 「高校の英文法を基本からおさらいする本 一歩前進編」
  • 英検4級(中学中級程度らしい)の頭脳

真ん中の2つの本は、、、家にあるって事は、、、買ったんだろうけど、
いつ買ったのかは記憶に無い。

まぁ、とりあえずこの2つの本を読むことから始めてみることにするかなと。。
明日 or 来週 or 来月から。

# 本日の意気込みだけで終わる可能性も。。。。。。。。。。。。。。

カテゴリー: その他 | タグ: , , , | コメントする

Flowplayerを使ってみる(2)

この記事は2年以上前に書いたものです。
そのため情報が古い可能性があります。ご了承ください。m(_ _)m

Flowplayerで、mp3もストリーミング再生出来るようになるとか。

Streaming plugin:  audio

Flowplayerを使ってみる」で設定した環境に、追加設定してみる。

# DocumentRootは、/home/apache22/https。

% cd /home/apache22/https/flowplayer/
% wget 'http://flowplayer.org/releases/flowplayer.audio/flowplayer.audio-3.1.0.swf'
% cd example
% cp index.php index_mp3.php

% vi index_mp3.php   ・・・id=”player”のAタグを↓に変更。

<div id="audio" style="display:block;width:750px;height:30px;"
     href="<?php echo urlencode($_SERVER["QUERY_STRING"]) ?>"></div>

あと、すぐ下の<script> ~ </script>を↓に変更。

<script>
 // install flowplayer into container
 $f("audio", "../flowplayer-3.1.1.swf", {
 
 // fullscreen button not needed here
 plugins: {
       controls:{
               fullscreen: false,
               heightm: 30
       }
 },
 clip: {
         autoPlay: true,
         // optional: when playback starts close the first audio playback
         onBeforeBegin: function() {
                 $f("player").close();
         }
 }
 });
</script>

サンプルのmp3取得

% wget 'http://flowplayer.org/demos/plugins/fake_empire.mp3'

/flowplayer/example/index_mp3.php?/flowplayer/example/fake_empire.mp3
へアクセスして再生できればOK。

ウチの環境だと、↓こんな感じのURLになる。
ttps://qos.mine.nu/flowplayer/example/index_mp3.php?/flowplayer/example/fake_empire.mp3

mp4やflvと同じように、こちらもmp3にアクセスすると、勝手にFlowplayerで再生されるように、mod_rewriteの設定をイジる。

<IfModule mod_rewrite.c>
  RewriteEngine   on
  RewriteCond     %{REQUEST_URI}  .*(?:mp4|flv)$
  RewriteCond     %{HTTP_REFERER} !flowplayer-.*swf
  RewriteRule      (.*(?:mp4|flv)) /flowplayer/example/index.php?$1 [R]

  # mp3用に追加
  RewriteCond     %{REQUEST_URI}  .*(?:mp3)$
  RewriteCond     %{HTTP_REFERER} !flowplayer.audio-.*swf
  RewriteRule      (.*mp3)         /flowplayer/example/index_mp3.php?$1 [R]
</IfModule>
% sudo /usr/local/etc/rc.d/apache22 reload

/flowplayer/example/fake_empire.mp3
へアクセスして、Flowplayerで再生できればOK。

ウチの環境だと、↓こんな感じのURL。
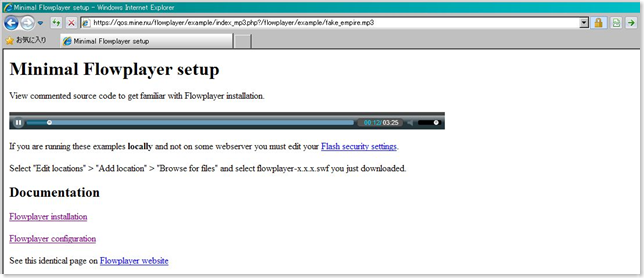
ttps://qos.mine.nu/flowplayer/example/fake_empire.mp3

↓画面イメージ。

flowplayer_mp3

カテゴリー: ソフトウェア | タグ: , , , , , | コメントする

Flowplayerを使ってみる

この記事は2年以上前に書いたものです。
そのため情報が古い可能性があります。ご了承ください。m(_ _)m

Flowplayer – Flash Video Player for the Web

を使えば、flvやmp4をストリーミング配信出来るらしい。不特定多数の方々に配信するなんて大それた事をするつもりは、サラサラ無く、自分用に使う事前提。オレオレ証明書を作成したのも、そのためだったり。

 Download Flowplayer – The Flash Video Player for the Web

からダウンロードして、DocumentRootのルートに展開してみた。

flowplayer/
    flowplayer-3.1.1.swf    ・・・Flowplayer本体
    flowplayer.controls-3.1.1.swf  ・・・よく分からず
    LICENSE.txt    ・・・freeを落としたので、GPLv3の規約が書かれている。
    README.txt    ・・・Flowplayerの更新履歴
    example/    ・・・Flowplayerの使用例がある

/flowplayer/example/index.html へアクセスすると、Flowplayerがhttp://e1h13.simplecdn.net/flowplayer/flowplayer.flv へアクセスして、自動で再生される。index.html内の、idがplayerなAタグのhrefを変更すれば再生するファイルを変更できる。ただ、毎回変更するのはクソ面倒なので、example/index.html を少々変更して、パラメータのファイルを再生するよう変更してみる。

% cd example
% cp index.html index.php
% vi index.php
<a  
     href="<?php echo urlencode($_SERVER["QUERY_STRING"]) ?>"  
     style="display:block;width:520px;height:330px"  
     id="player">
</a>

※ <?php ~ ?> の部分を変更

% wget http://e1h13.simplecdn.net/flowplayer/flowplayer.flv

https://qos.mine.nu/flowplayer/example/index.php?/flowplayer/example/flowplayer.flvへIE or Firefox or Operaでアクセスしてみる。
flowplayer.flvが、flowplayerでちゃんと再生されればOK。

わざわざ、パラメータで指定するのも面倒くさいので、mod_rewrite使って何とかしてみる事に。

 ↓

ってなればOKなので、

<IfModule mod_rewrite.c>
  RewriteEngine   on

  RewriteCond     %{REQUEST_URI}  .*(?:mp4|flv)$
  RewriteCond     %{HTTP_REFERER} !flowplayer-.*swf
  RewriteRule     (.*(?:mp4|flv)) /flowplayer/example/index.php?$1 [R]
</IfModule>

※ flowplayerがストリーミング再生用にGETする場合はrewriteしないように、REFERERをチェックしている。

% sudo /usr/local/etc/rc.d/apache22 reload

へアクセスして、flowplayerで再生されればOK。

参考サイト

カテゴリー: ソフトウェア | タグ: , , , , , , , | コメントする

オレオレ証明書を作成する

この記事は2年以上前に書いたものです。
そのため情報が古い可能性があります。ご了承ください。m(_ _)m

オレオレ証明書についての詳細は、以下。

オレオレ証明書をオレ専用に使用する(オレ以外には使わない)分には、問題ないと思われる。たぶん。用途はクライアント認証。

作成するに辺り以下のサイトを特に参照させて頂いた。

以下にオレオレ証明書を作成した時の手順記述する。(FreeBSD-7.2)

% mkdir ssl-self-signed
% cd ssl-self-signed


■ オレオレ証明書用CA(認証局)の作成 (※ 県名等々は適当)
% /usr/src/crypto/openssl/apps/CA.pl -newca
CA certificate filename (or enter to create)

Making CA certificate …
Generating a 1024 bit RSA private key
…………………………………..++++++
……………………..++++++
writing new private key to ‘./demoCA/private/cakey.pem’
Enter PEM pass phrase:
Verifying – Enter PEM pass phrase:
—–
You are about to be asked to enter information that will be incorporated
into your certificate request.
What you are about to enter is what is called a Distinguished Name or a DN.
There are quite a few fields but you can leave some blank
For some fields there will be a default value,
If you enter ‘.’, the field will be left blank.
—–
Country Name (2 letter code) [AU]:JP
State or Province Name (full name) [Some-State]:Kanagawa
Locality Name (eg, city) []:Kawasaki
Organization Name (eg, company) [Internet Widgits Pty Ltd]:foo bar Ltd
Organizational Unit Name (eg, section) []:System
Common Name (eg, YOUR name) []:qos.mine.nu-CA
Email Address []:root@qos.mine.nu

Please enter the following ‘extra’ attributes
to be sent with your certificate request
A challenge password []:
An optional company name []:
Using configuration from /etc/ssl/openssl.cnf
Enter pass phrase for ./demoCA/private/cakey.pem:
Check that the request matches the signature
Signature ok
Certificate Details:
・・・
Write out database with 1 new entries
Data Base Updated

demoCAというディレクトリが出来ているはず。オレオレ証明書用CAの秘密鍵やら公開鍵やらもその中に作成される。


■ オレオレサーバ証明書の作成

% mkdir server-keys
% cd server-keys

秘密鍵を作成

% openssl genrsa -des3 -out secret.key 2048
Generating RSA private key, 2048 bit long modulus
…………………………………………………………+++
…………………………..+++
e is 65537 (0x10001)
Enter pass phrase for secret.key:
Verifying – Enter pass phrase for secret.key:
% openssl rsa -in secret.key -out secret-nopass.key
Enter pass phrase for secret.key:
writing RSA key

CSR(Certificate Signing Request)作成

% openssl req -new -key secret.key -out csr.pem
Enter pass phrase for secret.key:
You are about to be asked to enter information that will be incorporated
into your certificate request.
What you are about to enter is what is called a Distinguished Name or a DN.
There are quite a few fields but you can leave some blank
For some fields there will be a default value,
If you enter ‘.’, the field will be left blank.
—–
Country Name (2 letter code) [AU]:JP
State or Province Name (full name) [Some-State]:Kanagawa
Locality Name (eg, city) []:Kawasaki
Organization Name (eg, company) [Internet Widgits Pty Ltd]:foo bar Ltd
Organizational Unit Name (eg, section) []:System
Common Name (eg, YOUR name) []:qos.mine.nu
Email Address []:root@qos.mine.nu

Please enter the following ‘extra’ attributes
to be sent with your certificate request
A challenge password []:
An optional company name []:

● オレオレCAで署名する

% cd ..
% cp /usr/src/crypto/openssl/apps/openssl.cnf .
% vi openssl.cnf
・・・
nsCertType          = server          ・・・コメントを外す
・・・
% openssl ca -in ./server-keys/csr.pem -out ./server-keys/server.cert -config ./openssl.cnf
Using configuration from ./openssl.cnf
Enter pass phrase for ./demoCA/private/cakey.pem:
Check that the request matches the signature
Signature ok
Certificate Details:
・・・
        X509v3 extensions:
            X509v3 Basic Constraints:
                CA:FALSE
            Netscape Cert Type:
                SSL Server
            Netscape Comment:
                OpenSSL Generated Certificate
・・・
Sign the certificate? [y/n]:y
CERTIFICATE WILL NOT BE CERTIFIED


■ クライアント証明書の作成

% mkdir client-keys

秘密鍵を作成(クライアント証明書用)
% openssl genrsa -des3 -out secret.key 2048
Generating RSA private key, 2048 bit long modulus
……………+++
……………………….+++
e is 65537 (0x10001)
Enter pass phrase for secret.key:
Verifying – Enter pass phrase for secret.key:

CSR(Certificate Signing Request)作成 (クライアント証明書用)

% openssl req -new -key secret.key -out csr.pem
Enter pass phrase for secret.key:
You are about to be asked to enter information that will be incorporated
into your certificate request.
What you are about to enter is what is called a Distinguished Name or a DN.
There are quite a few fields but you can leave some blank
For some fields there will be a default value,
If you enter ‘.’, the field will be left blank.
—–
Country Name (2 letter code) [AU]:JP
State or Province Name (full name) [Some-State]:Kanagawa
Locality Name (eg, city) []:Kawasaki
Organization Name (eg, company) [Internet Widgits Pty Ltd]:foo bar Ltd
Organizational Unit Name (eg, section) []:user
Common Name (eg, YO
UR name) []:user
Email Address []:user@qos.mine.nu

Please enter the following ‘extra’ attributes
to be sent with your certificate request
A challenge password []:
An optional company name []:


オレオレCAで署名する (クライアント証明書用)
% cd ..
% vi openssl.cnf
・・・
# nsCertType          = server          ・・・コメントにする
nsCertType = client, email              ・・・コメントを外す
・・・

% openssl ca -in ./client-keys/csr.pem -out ./client-keys/client.cert -config ./openssl.cnf
Using configuration from ./openssl.cnf
Enter pass phrase for ./demoCA/private/cakey.pem:
Check that the request matches the signature
Signature ok
Certificate Details:
・・・
        X509v3 extensions:
            X509v3 Basic Constraints:
                CA:FALSE
            Netscape Cert Type:
                SSL Client, S/MIME
            Netscape Comment:
                OpenSSL Generated Certificate
・・・
Sign the certificate? [y/n]:y

1 out of 1 certificate requests certified, commit? [y/n]y
Write out database with 1 new entries
Data Base Updated

● ブラウザにインポートしやすい形(秘密鍵と証明書のセット)にする

% cd client-keys
% openssl pkcs12 -export -in client.cert -inkey secret.key -out client.p12

出来たclient.p12をSCPとかで、クライアント端末に持ってきて、
ブラウザにインポートする。

サーバ証明書が見知らぬCAで署名されていると、「おまえ誰だよ?」的な感じで警告が出るので、オレオレ証明書用CAの証明書もブラウザにインポートする。demoCA/cacert.pem が、オレオレ証明書用CAの証明書なので、こいつもSCPとかでクライアント端末に持ってきて、インポート。


■ クライアント認証をするためのApache2の設定

辺りを設定する必要がある。

● 設定記述イメージ

Listen 443
NameVirtualHost *:443
<IfModule mod_ssl.c>
        <VirtualHost *:443>
            SSLEngine on
            SSLCertificateFile    /home/user/ssl-self-signed/server-keys/server.cert
            SSLCertificateKeyFile /home/user/ssl-self-signed/server-keys/secret-nopass.key
            SSLCACertificateFile /home/user/ssl-self-signed/demoCA/cacert.pem
            SSLVerifyClient require
・・・
            (他の設定)
        </VirtualHost>
</IfModule>

設定完了後、Apacheを再起動して、クライアント証明書をインポートしたブラウザでhttpsアクセス。証明書を要求され、インポートした証明書を選択することで正常にアクセスできたら成功。

Google ChromeはSSLクライアント認証をサポートしてないようなので、IEかFirefoxかOpera辺りで。

カテゴリー: サーバ管理 | タグ: , , , , , , | 1件のコメント

ファイル名をEUC-JPから、UTF-8に変更

この記事は2年以上前に書いたものです。
そのため情報が古い可能性があります。ご了承ください。m(_ _)m

玄箱のlocaleをEUC-JPから、UTF-8に変更したら日本語ファイルが文字化けてしまったので、変換する方法を探したところ、以下を発見。

ファイル名をEUC-JPやShift_JISからUTF-8へ変換する

①$sudo aptitude install convmv
②変換したいファイルがあるフォルダで以下のコマンドを実行する
  a)EUC-JPから変換する場合
    $ convmv -r -f euc-jp -t utf8 * –notest

convmv・・・こんな素敵なツールがあったとは。

localeを変更した理由は何となく。。

カテゴリー: ソフトウェア | タグ: | コメントする

SeagateのHDD

この記事は2年以上前に書いたものです。
そのため情報が古い可能性があります。ご了承ください。m(_ _)m

にバグがあって、HDDが応答しなくなるとかならないとかの話が、かなり前(2009年01月)にあったけど、そういえば自分のHDDをチェックしてなかった。。

今日現在動作している、Seagate製のHDDは、ST31500341AS、ST380815AS、ST31000333ASの3つ。

シリアル番号確認ユーティリティ(seagate)

で確認したところ何れも「No action required.」と。
ま、今更なんですけど。。。

以下、情報収集時に参照したサイト。

Seagate | ひねもす庵

スラッシュドット・ジャパン | Seagate製HDDの最新ファームウェアに新たな問題

カテゴリー: ハードウェア | タグ: , | コメントする

firefox 3が遅くなった→ SQLite reindexで解決&高速化 – しおそると

この記事は2年以上前に書いたものです。
そのため情報が古い可能性があります。ご了承ください。m(_ _)m

firefox 3が遅くなった→ SQLite reindexで解決&高速化 – しおそると

で、ふと思い立って Firefox 3 で利用している、SQLite データ群をかたっぱしから Reindex したら、
昔のスピードが再現しました。はやい!

改善:2つ
 1)起動が速くなった(起動に1-2分かかる→すぐ起動。劇的に改善。)
 2)サイト表示もはやい。 cookies などの処理がはやくなったため?


自動でReindexしてくれるアドオンもあるらしい。

Mozilla Re-Mix: Firefoxのデータベースを最適化して高速化を図るアドオン「SQLite Optimizer」

カテゴリー: その他 | タグ: | コメントする

FreeBSD 7.2-RELEASE

この記事は2年以上前に書いたものです。
そのため情報が古い可能性があります。ご了承ください。m(_ _)m

FreeBSD 7.2-RELEASE登場 – スラッシュドット・ジャパン

FreeBSD 7.2-RELEASE登場,安定ブランチの最新版 – Jail仮想化機能IPアドレス強化とスーパーページ改善|gihyo.jp … 技術評論社

FreeBSD 7.2-RELEASE Announcement

FreeBSD 7.2-RELEASE Announcement

The FreeBSD Release Engineering Team is pleased to announce the availability of FreeBSD 7.2-RELEASE. This is the third release from the 7-STABLE branch which improves on the functionality of FreeBSD 7.1 and introduces some new features. Some of the highlights:

  • support for fully transparent use of superpages for application memory

  • support for multiple IPv4 and IPv6 addresses for jails

  • csup(1) now supports CVSMode to fetch a complete CVS repository

  • Gnome updated to 2.26, KDE updated to 4.2.2

  • sparc64 now supports UltraSparc-III processors

For a complete list of new features and known problems, please see the online release notes and errata list, available at:

For more information about FreeBSD release engineering activities, please see:

・・・
FreeBSD Update

The freebsd-update(8) utility supports binary upgrades of i386 and amd64 systems running earlier FreeBSD releases. Systems running 7.0-RELEASE, 7.1-RELEASE, 7.2-BETA, 7.2-RC1, or 7.2-RC2 can upgrade as follows:

# freebsd-update upgrade -r 7.2-RELEASE

During this process, FreeBSD Update may ask the user to help by merging some configuration files or by confirming that the automatically performed merging was done correctly.

# freebsd-update install

The system must be rebooted with the newly installed kernel before continuing.

# shutdown -r now

After rebooting, freebsd-update needs to be run again to install the new userland components, and the system needs to be rebooted again:

# freebsd-update install
# shutdown -r now

Users of earlier FreeBSD releases (FreeBSD 6.x) can also use freebsd-update to upgrade to FreeBSD 7.2, but will be prompted to rebuild all third-party applications (e.g., anything installed from the ports tree) after the second invocation of “freebsd-update install”, in order to handle differences in the system libraries between FreeBSD 6.x and FreeBSD 7.x.
・・・

freebsd-updateユーティリティでバイナリアップグレードが可能らしい。
以下が詳しい。

FreeBSD 7.0 へようこそ:第3回 freebsd-updateで楽々リリースサーフィン|gihyo.jp

UNIXの部屋 コマンド検索:freebsd-update (*BSD/Linux)

On-line Manual of “freebsd-update”


遠隔地のサーバを、sshでアクセスして、サクッとUpgradeしてみることにした。
途中で失敗して立ち上がらなくなったりしたら、飛行機代があれだけど。。

% uname -r
7.1-RELEASE-p4

% freebsd-update –help

usage: freebsd-update [options] command … [path]

Options:
  -b basedir   — Operate on a system mounted at basedir
                  (default: /)
  -d workdir   — Store working files in workdir
                  (default: /var/db/freebsd-update/)
  -f conffile  — Read configuration options from conffile
                  (default: /etc/freebsd-update.conf)
  -k KEY       — Trust an RSA key with SHA256 hash of KEY
  -r release   — Target for upgrade (e.g., 6.2-RELEASE)
  -s server    — Server from which to fetch updates
                  (default: update.FreeBSD.org)
  -t address   — Mail output of cron command, if any, to address
                  (default: root)
Commands:
  fetch        — Fetch updates from server
  cron         — Sleep rand(3600) seconds, fetch updates, and send an
                  email if updates were found
  upgrade      — Fetch upgrades to FreeBSD version specified via -r option
  install      — Install downloaded updates or upgrades
  rollback     — Uninstall most recently installed updates
  IDS          — Compare the system against an index of “known good” files.


/var の容量が少ないので、-d /home/tmp/freebsd-updateとかにしておく。

% sudo freebsd-update upgrade -r 7.2-RELEASE -d /home/tmp/freebsd-update

Looking up update.FreeBSD.org mirrors… 6 mirrors found.
Fetching public key from update1.FreeBSD.org… done.
Fetching metadata signature for 7.1-RELEASE from update1.FreeBSD.org… done.
Fetching metadata index… done.
Fetching 2 metadata files… done.
Inspecting system… done.

The following components of FreeBSD seem to be installed:
kernel/generic src/base src/bin src/contrib src/crypto src/etc src/games
src/gnu src/include src/krb5 src/lib src/libexec src/release src/rescue
src/sbin src/secure src/share src/sys src/tools src/ubin src/usbin
world/base world/dict world/doc world/games world/info world/manpages
world/proflibs

The following components of FreeBSD do not seem to be installed:
src/cddl world/catpages world/lib32

Does this look reasonable (y/n)? y

Fetching metadata signature for 7.2-RELEASE from update1.FreeBSD.org… done.
Fetching metadata index… done.
Fetching 1 metadata patches. done.
Applying metadata patches… done.
Fetching 1 metadata files… done.
Inspecting system… done.                        ← ここで多少時間掛かる
Fetching files from 7.1-RELEASE for merging… done.

Preparing to download files… done.           ← ここからがかなり長い
Fetching 30796 patches…..10….20….30….40….50….60….70….80….90….100….110….1

・・・

…30760….30770….30780….30790… done.
Applying patches… done.
Fetching 581 files… done.
Attempting to automatically merge changes in files… done.

The following file could not be merged automatically: /etc/mail/mailer.conf
Press Enter to edit this file in /usr/bin/vi and resolve the conflicts
manually…            ← 自動でマージ出来なかった場合(?)は、viが立ち上がって手動修正

この後、Updateで削除されるファイル、追加されるファイル、更新されるファイルの一覧が表示されて終了。

% sudo du -hs /home/tmp/freebsd-update
583M    /home/tmp/freebsd-update

と、それなりのサイズに。
次のコマンドで、実際にインストールされる。

% sudo freebsd-update install -d /home/tmp/freebsd-update

Installing updates…
Kernel updates have been installed.  Please reboot and run
“/usr/sbin/freebsd-update install” again to finish installing updates.

% sudo shutdown -r now

を叩いた後、1分ほど黙祷。その後、sshでログインしてみる。
ログインできたら、メッセージの通り再度、

% sudo freebsd-update install -d /home/tmp/freebsd-update
Installing updates… done.           ← そこそこ時間掛かる

でUpgrade完了。

% uname -r
7.2-RELEASE

ついでに、7.2-RELEASEが更新されたら通知してくれるよう、cronの設定もしておく。

% sudo vi /etc/crontab
0 3 * * * root /usr/sbin/freebsd-update cron -d /home/tmp/freebsd-update

を最終行に追加。

freebsd-update cron は、基本fetchと同じらしい。違いは、処理開始前に、1 ~ 3,600秒スリープすることと、結果をメールすることくらい。
man freebsd-update
に書いてある。
view /usr/sbin/freebsd-update
で、ソース見た方が早いかも。かなり見易く綺麗なソースだ。

カテゴリー: サーバ管理 | タグ: , , , | コメントする